

Mid-Tier Suspension 1.5-3.5″ Lift Kit For Increasing Ground Clearance & Fitting Larger Tires
Dobinsons has been obsessively engineering the best suspension components since its establishment in 1953. That obsession and quality is now available for the 6G Bronco.
I personally have had the Dobinsons MRR 3-way adjustable shocks on a 3rd Gen Tacoma that I had prior to the Bronco, and I was absolutely in love with them. Having had that experience, I was very excited to see what Dobinsons entry level (for the Bronco) lift kit offered.
Quick thanks to the guys at Trail Bronco for working on this with me. I am lucky enough to get to test this IMS kit and the brand new MRR kit back to back, and this would not be possible without those guys. So thank you, and thank you Dobinsons for the opportunity.
Also, if you would like to follow along with a video, it’s linked at the end of the post!
Alright, lets get into it.
Find It Online
- IMS Lift Kit
- 4 Door: Check Price
- 2 Door: Check Price
- Diff Drop: Check Price
- Adjustable Panhard Bar: Check Price
Table Of Contents
Before You Start

Before you start ripping apart the Bronco, there are some things you should check. I wish I would have looked at this prior as it would have saved me a lot of time and allowed me to prepare better for the install.
Look at all of the stock suspension components that are about to be removed, specifically the mounts, and inspect them for any damage. If there is anything that may prevent you from being about to put the Bronco back together, get a game plan in place of how you are going to handle that prior.
For example, the mounts for the lower contrail arms, lower shock mount on the axle, and the trailing arms, are all prone to rock damage. On my Bronco, the lower shock mount in the rear was bent so bad on mine, that I was not able to repair it. This meant that the stock brackets had to be cut out and new ones welded in which added 3 days to this install.
To be clear, no cutting or welding is required for this lift kit. I had to just because there was irreparable damage on the mount. If everything is clear, this is a bolt in kit.
Torque Specs
- Outer Tie Rod – 46 ft lb
- Skid Plates – 22 ft lb
- Shock Absorber Assembly Lower Nuts (Front) – 66 ft lb
- Stabilizer Bar Link Lower Nut – 122 ft lbs
- Lower Control Arm Bolts – 210 ft lbs
- Shock Absorber Lower Bolt/Nut – 350 ft lbs
- Shock Absorber Upper Nut – 41 ft lbs
- Front stabilizer Bar Bracket – 66 ft lbs
- Rear Shock Absorber Upper Nut – 41 ft lbs
- Panhard Rod – 159 ft lbs
Step 1. Before Measurements

Before tearing in to the Bronco, take some before measurements. The best way to measure is from the center of the hub to the bottom of the fender flare. That way if you are upgrading the tire size at the same time than upping the tire size will not effect this measurement.
Before & After
- Front: from 21″ to 22.5″
- Rear: from 22″ to 24″
Step 2. Remove Skid Plates

There are two separate skid plates that will need to be removed, held on by six 15mm bolts. Start with the front, then the back.
If you are installing the stabilization bar relocation kit, then also remove the skid plate that is covering the stabilization bar. This skid will have another four, 15mm bolts holding it in place.
Step 3. Differential Mount Removal

I chose to do the diff mount first, but you can also do this later in the install if you would like.

Remove the two 18mm bolts on the bottom, the 21mm bolt that attached the mount to the differential, and the 21mm bolt that goes through the frame behind the transmission cooler. You will need to remove the 10mm bolts and pivot transmission cooler out of place.
Step 4. Attach Diff Drop Mount

The new mount goes in exactly how the old comes out. It is a very easy swap. Put the diff drop in to place and thread the two 18mm bolts back in to hold it in to place. Then feed the 21mm bolts through the frame and through the differential and tighten. At this point, you can tighten the 18mm bolts down.
Step 5. Stabilization Bar Disconnect
Remove one of the connections of the end link. It doesn’t matter if you disconnect it at the top or bottom of the end link. Then remove the four 18mm bolts holding the stabilization bar on to the frame.
If your Bronco is equipped with the stabilization bar disconnect, then you will want to support the swaybar or disconnect the wiring harness and remove the bar entirely.
Step 6. Loosen Strut Tower Bolts

Loosen the three, 15mm bolts that are on the top of the strut. Do not fully remove these, otherwise they may fall out when in the process of the next step. Leave a few threads on each to hold it in place, while giving it some movement.
Step 7. Lower Control Arm Removal

Before removing the two cam bolts holding the LCA to the frame, mark the location so you can get it close when you reinstall. I just used painters tape and a sharpie to mark the location.
With it marked, it is time to remove the bolts. You will need a 21mm and a 24mm socket. The 21mm will be used to hold the cam bolt in place while the 24mm will back the nut off of the bolt.
You may need a mallet to get the lower control arm out of the frame.
Step 8. Lower Shock Bolt Removal

Remove the two 18mm bolts that are holding the strut to the lower control arm. Once removed, you will be able to drop the lower control arm completely out of the way. Again, a mallet might be needed here.
Step 9. Strut Removal From Tower

Now, removed the three 15mm bolts that were loosened in step six. Support the strut somehow so it does not fall out of the tower and cause injury. I made a c shape with my left hand which captured a portion of the spring and anchored it on the strut tower.
It is possible that you may have to remove the tie rod from the knuckle to give yourself enough room to remove the strut completely.
Step 10. OEM Top Hat Removal

You will need a spring compressor for this step, or simply have a shop do it.
Apply the spring compressors to the OEM struts with about 3 inches of thread left exposed. This will allow for the spring to fully decompress without losing the threads and shooting off. Tighten the compressors until there the spring begins to lose contact with the top hat.

Before removing the top hat, take note of the orientation of the top hat in relation to the bottom of the strut. Remove the top hat with an 18mm socket.
Step 11. Setting Spring Seat Height

Now it is time to set the spring seat height on the Dobinsons IMS shocks. For the front, Dobinsons tells you to set it at 9.55″ from the center of the lower bolt to the where the lowest point of the spring will sit on the spring seat. I found that 9.55″ here gave me 5″ of lift, which was entirely too much. Over multiple iterations, I ended at 7.25″ which was about an inch and a half of lift. I would recommend starting at 7.75″, but you may need to adjust further from there.
Now would be a good time to set the rear spring seat height as well, which should be set at 7.66″
Once the spring seat height is set, lock the nuts using the provided shock wrenches.
Step 12. Front Coilover Mounting & Reassembly

At this point, you will do everything you just did in the reverse order. Feed the strut in to place from in between the lower control arm, and hand tighten at least one of the nuts on the top hat to hold in place. From here, slide the bottom strut mount bolts through the two wholes in the lower control arm and again hand tighten the nuts.

From here, put the lower control arms back in place. I used a jack to lift the lower control arm in to place since it is under tension of the front strut. The cam plate with only go on the cam bolt one way. Once on, make sure you line it up to the markings that would made prior to removal. You will still need an alignment, but this will get you to the shop with at least something that is close.
At this point, it is just a matter of bolting up the sway bar bolts, and all the other bolts here. Please note that components with bushings should be torqued when they have a load on them.
Next up… the rear!
Now it is time to move on to the rear. I also got an adjustable panhard bar so that will be part of the installation for the rear. If you are looking on steps on how to replace the lower trailing arms, then that will be covered in my MRR post. I did not feel comfortable dropping the gas tank in my driveway, so I had a shop do that at a later date.
Step 13. Fender Liner Removal

The rear strut installation starts with the removal of the fender liner. If you are anything like me, this is going to be a very messy job.
There are three, 7mm bolts at the front of the liner, one thumb screw on the driver side and two thumb screws on the passenger side at the top of the liner, and many push pins. All will need to be removed before you can pull the liner out.
Step 14. Bend Sheet Metal

In order to gain access to the three, 15mm bolts that are on the strut tower, you will be to bend some sheet metal out of the way. Directly above these bolts is a small portion of metal that hangs lower than the rest of the metal. Simply bend that out of the way using a mallet.
Step 15. Lower Strut Bolt Removal

In order to remove the lower strut mount bolt, you will need a 27mm and a 30mm socket. I put the 27mm on a ratcheting wrench, and the 30mm on an impact gun.
You will also see that in the photo I have remove the lower trailing arm bolt. I found that not to be necessary when swapping the struts, so if you are not going to be replacing the lower trailing arms at the same time, just leave them bolted in.
Step 16. Strut Tower Bolt Removal

With the lower bolt removed, it is time to remove the strut tower bolts. There are three 15mm bolts holding the strut to the strut tower. Removal all three. When you are at the end of the last bolt, be sure that the strut is supported so it does not fall. Remember, the lower bolt is not longer holding it in place.
Step 16. Top Hat Removal
Just like with the front, you will need to pull the OEM top hat off of the factory strut. Grab the spring compressor again, and compress it enough to get the top hat off.
Step 17. Rear Strut Assembly

With the spring seat height set, it is time to compress the springs and install the top hat. I found that with this spring seat height, I was able to compress it enough at home, without having to take it to a shop.

Again note the orientation of the top hat in relation to the lower shock bolt. I actually test fit the rear as it was less forgiving than the front. You can see the the spring compressors are still on the spring in the photo above which allowed me to twist the top hat freely.
Step 18. Mounting Strut
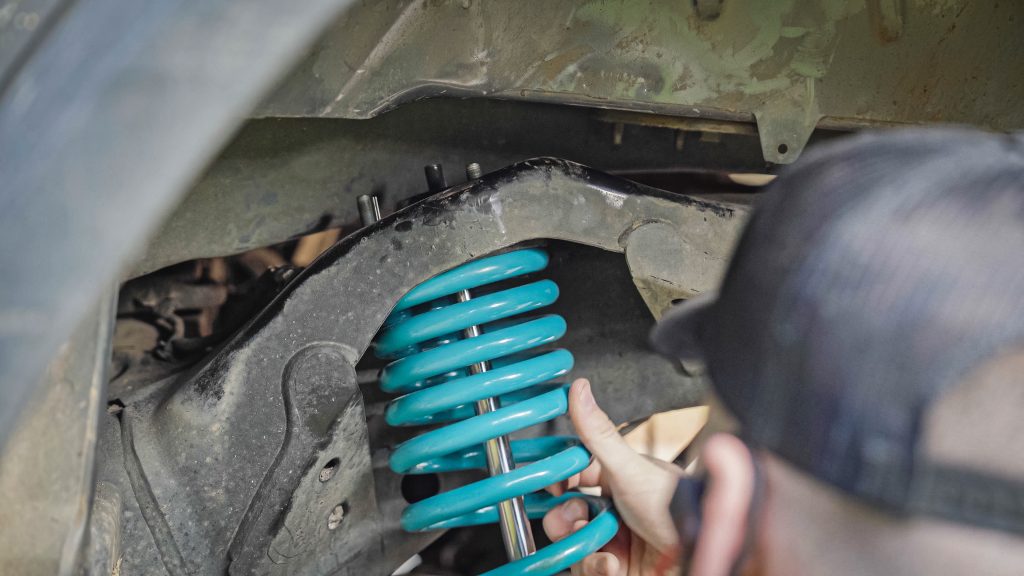
Time to install the new struts in the rear! Just like with the front, get the top hat in place in the strut tower, and place at least one 15mm bolt and hand tighten it to capture the strut. From here, you can install the lower bolt.

When you install the lower bolt, there are two spacers that go on either side of the lower shock bushing. Do not forget to place these as they are what keeps the shock centered in the bracket and prevents them from colliding.
With everything in place, begin to tighten the bolts. You will have to lift the rear axle with the use of a jack in order for the top hat to fully seat in the strut tower, and before you can tighten those bolts. DO NOT tighten the bolts while the axle is at full droop to pull the strut in to place. This can damage the threads or even sheer the bolt entirely.
Do not torque these components until the vehicle is back on the ground.
Step 19. Panhard Bar Removal

There are two 24mm bolts holding the pan hard bar in place. You may need a breaker bar to get these off. Also, do this while the vehicle is at ride height as that is where there is the least tension on it.
Break the two bolts loose and remove them all the way. You may need a mallet to tap the portion mounted to the frame off.
Step 20. Set Bar Length

Take a measurement of the stock pan hard bar. I measured from the center of the bolt hole to the center of the bolt hole on the other side. This may not be where the bar needs to be, but it will be a good starting point.
A pan hard bar is there to keep the axle centered in the frame, so you can visually inspect this and see if any changes need to be made. If you need to pull the body over the the driver side, then you will shorten the bar. Push to the passenger side, then you will extend it.

Once the length is set, install the panhard bar back in.
Step 21. Reinstall Wheels
Finally it is time to put the wheels back on the rig and get this thing on the ground! Once it is on the ground, be sure to torque everything that you touched during this install and retorque the wheels after about 100 miles of driving.
Initial Impressions

Immediately, I notice an increase in ride quality. Even with the heavier springs, it felt more supple than the Bilstein’s that came off of it. This kit just soaks it all up on the road, anything from minor road imperfections to potholes and speed bumps.
This supple ride does come with a downfall however. There is quite a bit more body lean when cornering and a lot of brake dive as well. Not to the point where it feels unsafe or enough that you no longer have control over the Bronco, but it is a noticeable difference. But, that makes it good off-road.
When off-road, the tuning of these shocks makes even more sense. Along with the supple ride, which helps on these rocky and bumpy trails, this moves and articulates with the obstacles well. The IMS feels more compliant off-road than the standard shocks. Where the Bilstein’s feel like they fight to keep each side as it gets closer to full compression, the IMS, due to the longer stroke, allows for more movement at the end of the stroke. What this means is that the IMS felt level more of the time and would take a bit to get off-camber.
Final Thoughts

Overall, the installation was relatively easy. While I ran in to other issues, such as damaged brackets, I had no issue with the kit itself. This could very likely be done in one day, provided you have all the necessary tools and there is not damage to the any part of the frame or axle that you will be working around.
I am going to save my detailed thoughts on the actual performance of the kit until after I get the MRRs on and can compare these two lift kits, but I will say these shocks surprised me with their performance. Great kit, especially given it’s price point.
I hope this helped. If you have any questions, feel free to leave a comment and I will get back to you. And keep your eyes peeled for the next posts!

Was the bronco a badlands, or badlands sasquatch, or just sasquatch? I’m trying to decide where to set mine and I don’t really want to have to do it 3 or 4 times. I know 9.5 is going to be too much as that’s what everyone seems to say. I was going to start at 8″ on the front and 7″ on the rear for my measurements. Was the 5″ you measured initially after driving around or just setting it down and measuring? I have a crap ton of questions if you’re willing to give me a shout I’ll provide… Read more »